
PowerPoint: 3 Quick Fixes
Here're the solutions to three common PowerPoint issues. We hope they help you create more memorable presentations.
How do I embed a YouTube video in PowerPoint?
Before you do this make sure you have the permission of the copyright holder.
This method requires an internet connection. Assuming there is one, follow these steps:
- Click 'Insert' on the ribbon within PowerPoint
- Click the arrow below the film real (see below)
- Then select 'Video from Web Site' - a box will appear asking for the embed code
- Load the YouTube video in your browser
- Right click on the video, and select 'Get Embed Code' - copy and paste this into the box in PowerPoint

Note: If an internet connection isn't available you are better off embedding the video into the presentation file. If you select 'Video from File' (instead of 'Video from Web Site), it will open a window where you can locate the video on your computer. Your PowerPoint file will be larger, but you'll no longer need an internet connection.
The text I used isn't displaying correctly
This happens when you create a presentation on one computer and display on another. If the second computer doesn't have the fonts you used to create your presentation, you'll end up with the best approximation PowerPoint can deliver. The way around this is to embed the fonts you use within your presentation file.
Embedding fonts in your PowerPoint file is easier than you may think, although it will result in a larger file size. The steps are:
- Click 'File' at the top of the screen
- Select 'Options' on the menu which appears
- The PowerPoint Options window (shown below) will appear - select 'Save' on the navigation
- Check 'Embed fonts in the file' (highlighted in red below). If your presentation might be edited on another computer also select 'Embed all characters...'

My file size is too big
File size can be problem when transporting or emailing PowerPoint presentations. Images, embedded video and wordart are the most common reasons for large file size. The method described here applies to images and allows you to permanently remove unwanted 'cropped' areas.
In addition to removing previously 'cropped' areas, this method also reduces the quality of the displayed image. You should bear this in mind if you plan on presenting detailed pictures on very large, high definition screens. In this case, this method might not be applicable. This cautionary note aside, the following should produce acceptable results for most business presentations:
- Select your picture (by clicking on it in the normal manner)
- Click format on the top ribbon
- Then click 'Compress Pictures' (highlighted below)

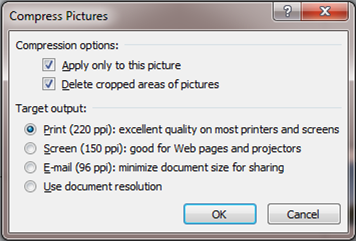
- For deleting unwanted cropped areas, tick the second box in 'Compression options'
- For reducing the detail of your images, select 'Print' on the Target Output
Note: You need to change the default options if you want to retain detailed photographs in your presentation. Select 'Advanced', and tick 'Do not compress images in file'.